Best Practice Software

Bp VIP.net Appointment Book Shortcuts

Bp "Tips & Tricks" Blog Image for Bp VIP.net

Our Training and Deployment Specialist, Warren Goertz, has some handy appointment book shortcuts to help you streamline appointment management, including the ability to quickly access existing appointments or search for available time slots.

Look Up Past and Future Appointments For a Patient

To access a patient’s appointment history, simply press the space bar while in the appointment book. From there, you can select a booked slot to view the appointment history for that patient or select any other slot and press space bar to open the search screen and find the patient’s appointment history.

This shortcut is particularly useful if you need to quickly look up a patient’s past or upcoming appointment while during another task. To access the search screen quickly, press Tab and Space in sequence to move off the Booking column and open the search screen.

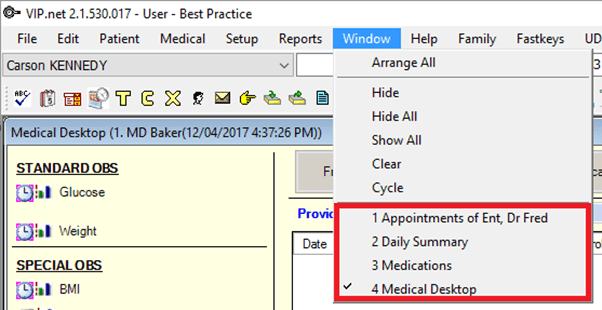
Additionally, you can access a patient’s appointment history from anywhere in Bp VIP.net by pressing Ctrl+Space or by clicking the third icon from the left in the main toolbar. This feature enables you to view appointment history without having to have the appointment book open.

Search For an Appointment
   1. Searching For a Free Appointment

a.  Open the Find Appointment Slot screen by pressing Ctrl+F. 

Bp VIP.net screenshot of screen with Find Appointment Slot open

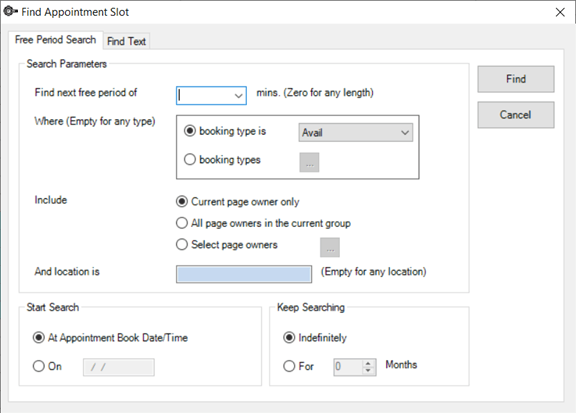
b.  Look for an available appointment slot by using the Free Period Search function.

c.  Choose your search parameters, including the Start Search date if you’re not searching from the current appointment book date and time.

d.  Decide how long you want to search for appointments by selecting to Keep Searching indefinitely or for a specific number of months.

e.  Click the Find button. Bp VIP.net will then locate the next available appointment that matches your search criteria and bring it into focus.

   2. Search For a Booking By Text

a.  Press Ctrl+F to open the Find Appointment Slot screen. 

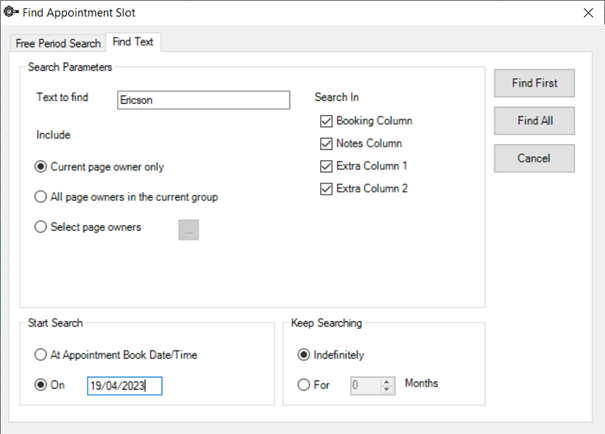
b.  Switch to the Find Text tab.

c.  Select the search parameters. Please note that wildcards cannot be used in the text search.

d.  If you want to search for bookings beyond the current appointment book date and time, specify a Start Search date.

e.  Choose whether to Keep Searching indefinitely or for a specified number of months after the Start Search date.

f.  Click Find First to locate the first instance of the search term from the start date or click Find All to locate all instances.

Book an Appointment

If the patient is already loaded in the Snapshot bar, select an empty slot in the Booking column and press Ctrl+Enter to book them into that slot.

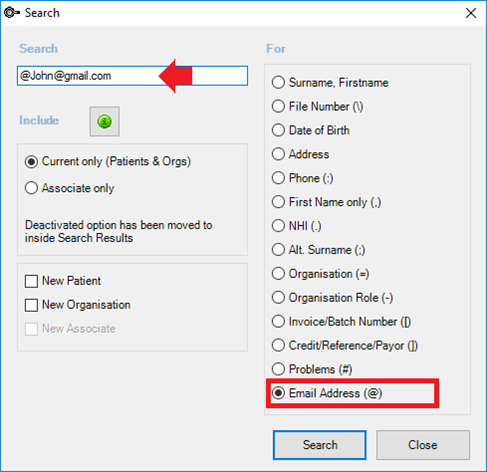
If the patient is not in the Snapshot, select an empty slot in the Booking column and type a search term for the patient you want to book. The search term can be any information accepted by the Search screen (F2), such as the patient’s name, initials, file number, date of birth, address, or phone number. If the patient is found in the system, they will be booked for the empty slot. If there are multiple matching records, select the correct patient from the search results and confirm the booking.

If the patient is not recorded, Bp VIP.net will prompt you to create a new patient by opening the Patient Details screen. You only need to enter the patient’s first and last name to book an appointment, and you can update their details later.

You can also add a booking from the Waiting List by opening the Monthly view with Ctrl+M, selecting a patient or booking from the list on the right of the screen, and dragging it to an empty slot in the appointment book.

For more tips and tricks, check out our Bp VIP.net Knowledge Base!

Share this article:

MyComms Tips & Tricks for Bp VIP.net Users

Our Training and Deployment Specialist, Warren Goertz, has some handy tips and tricks to help you use MyComms in Bp VIP.net more efficiently.

1. Communications Preferred View 

Most Bp VIP.net users know outgoing and incoming communications are accessed from the keyboard shortcut Shift + F4, but did you know you can create your own keyboard shortcuts to the MyComms screen using filters? The filters section is on the right-hand side of the MyComms screen. There are over 20 different filter options available.

By default, MyComms shows all outgoing correspondence from the last two weeks. You can change the type of documents shown and the time period using the filter options on the right-hand side.

In the example shown, a user has modified the Providers and Users filters to show only correspondence associated with selected providers and users. The filter options are coloured red to indicate they have been changed. 

Click Save Settings to save your preferences as a shortcut so you can switch to your preferred view whenever you view MyComms. 

2. Filtering Letters By Provider

Are you a practitioner who only wants to see your own letters or a typist who only needs to see a particular doctor’s letters? Select the Providers checkbox on the right of the screen from the filters section of the screen in MyComms and select the providers you wish to see letters corresponding with.

Have you been using a particular filter regularly? Save it! Once the filter is selected, click the Save Settings button from the right-hand panel in the MyComms screen, and give the filter a name and a shortcut. The shortcut is saved to Bp VIP.net for use on any screen or from your Fastkeys menu. 
3. SMS Messages Over 160 Characters

Want to send SMS messages from Bp VIP.net that are longer than 160 characters? Select the Extend option from Facility Preferences for the message to be split into multiple SMS messages. 

Go to Setup > Preferences > Facility Preferences > Communications. The checkbox Extend character limit beyond 160 controls whether Bp SMS allows override of the 160-character limit. This checkbox is disabled by default upon upgrade. If a practice ticks this checkbox, Bp VIP.net will send as many SMS messages as required if the number of characters in the message is more than 160. If this checkbox is unticked, Bp VIP.net will truncate the message to the first 160 characters.

For more tips and tricks, check out our Bp VIP.net Knowledge Base!

Share this article:

Bp VIP.net Tips & Tricks

VIP.net Tips and Tricks

Our Bp VIP.net Training and Deployment Specialist, Johanna Monson, has five handy tips and tricks to share with you to help you become more efficient using Bp VIP.net.

1. The Email Search

Our first tip looks at using the new, convenient email search functionality that was made available in the Bp VIP.net Topaz release. The Email Search lets you quickly link emails in your Inbox to the corresponding patient in Bp VIP.net. Type the @ symbol before the email address to quickly activate the email search function or select the Email Address (@) radio button.

VIP.net Tips & Tricks Image 1
2. Using the Window Menu

Did you know that the Window menu drop-down lets you see all the screens you currently have open in Bp VIP.net?

The ticked screen title identifies which screen you currently have in focus, and you can select another open screen by clicking on the various titles listed. This is particularly handy if you have accidentally clicked outside of the Bp VIP.net screen and lose the screen that you were working on. Simply click on the screen title you need and resume your task.

VIP.net Tips & Tricks Image 2
3. Advanced Formatting Tools

The formatting of Templates in Bp VIP.net can be enhanced by using your right-click on the Template screen. When you right-click at the top or bottom of a template, you will get an advanced option to set up Margins and Paper, Headers and Footers, and Columns and Borders.

When you right-click in the template’s body, you will see the advanced option to set Paragraph-Formatting and Indents, and Frame and Page Breaks.

The pagination settings are similar to the tools that you would be familiar with using in Microsoft Word and are handy in ensuring your letters are well formatted over multiple pages.

When you right-click within a table, you can open the Table Properties to change cell margins, borders, cell colours, and alignment.

When creating new templates, it’s advantageous to keep the formatting symbol turned on to make your current formatting visible. This conveniently identifies any hidden extra spaces, font size variations, line breaks, and other pesky hidden formatting that may be wreaking havoc in your template.

4. Accessing MIMS

Have you ever wanted to check the MIMS database in Bp VIP.net without starting the prescribing process? Clinical users can click the Help menu, then MIMS to open and view the MIMS database.

VIP.net Tips & Tricks Image 3

 5. Faster Prescribing in Bp VIP.net

When creating a script for a commonly prescribed medication in Bp VIP.net, the Save button at the top of the details section allows you to save the directions included in the orange section of the Prescription Item Details. This feature will save your clinicians time when prescribing a regular medication as they can conveniently select from the saved default.

Likewise, you can create a prescription, complete the directions, and enter the first dose. Then, click save in the Saved Default section, alter the Dose and click Save again. You will now have all the regular doses for the selected medication pre-saved.

VIP.net Tips & Tricks Image 4

The saved default list can also be deleted in the clinician’s Provider Screen. Select Setup, then Internal Providers, select the provider record and click on the Internal tab. Click the Doses button to manage the list of the provider’s pre-saved doses.

If you have one provider you prefer to maintain the list of saved Doses, other providers can access their list by entering the provider’s name in the Use Dose Entries From field.


For more tips and tricks, check out our recent Be In The Know webinar recording covering Advanced Prescribing in Bp VIP.net. Now accessible from the Knowledge Base!

Share this article:

Pendable to Pended Invoices and Medicare Web Services

Pending to pendable invoices blog image

After you upgrade to Topaz Service Pack 1 and begin submitting claims under the Medicare Web Services framework, you will notice different statuses in return messages and the Transactions history, particularly PENDABLE and PENDED.

The new PENDABLE to PENDED workflow may change the way your practice searches for and actions unpaid claims. Best Practice Software recommend actioning PENDABLE claims and resubmitting the invoice immediately if an invoice is returned with PENDABLE, rather than reviewing such claims as an end of day activity.

This article explains why.

For more information on how to resubmit a PENDABLE invoice, review Modify a pendable claim.

What Do the Pending Statuses Mean?

Simple claims that have the Assessment Code of : Assessed do not require manual operator assessment. Such claims are submitted, assessed, and paid or unpaid like they were in previous versions of Bp VIP.net.

However, if the claim has supporting information such as service text, the claim may require an operator to check the supplementary information provided with the invoice before the claim can be accepted. If this is the case, the claim will return the status of PENDABLE (or MEDICARE_PENDABLE) indicating a further action and resubmission is required.

The PENDABLE status could be applied for several reasons, such as:

  • Service text is required for a standard item number, for example, ‘Not normal aftercare’
  • Item numbers and duplicate items that require additional service text information, such as reasons for Multiple procedure overrides
  • An individual item deemed assessable prior to approval, for example, some diagnostic imaging and pathology items.

Any supplemental information with the potential to require manual assessment can return as PENDABLE, even for otherwise non-complex invoices for item numbers your practice processes daily.

Can I Modify a PENDABLE Claim?

Yes. While a claim is PENDABLE, it has not yet been received for manual assessment by Medicare. This enables you to check that all necessary information is provided in the service text and to immediately resubmit the claim. 

Resubmitting the claim to Medicare will update the status to PENDED to notify you that the claim has been received and will be manually assessed by an operator before payment of the rebate to the patient, or notification to the patient of the decline.

While the claim has the status of PENDABLE, two actions can be performed:

  1. Modify the invoice within the hour of creation to provide more information in the Service Text section under the chevron (F5), and resubmit.
  2. Reverse or Requote the Invoice if you have made a genuine error and do not wish to proceed with the claim.

How Do I Review and Modify a PENDABLE Claim?

When the claim is in PENDABLE status, you can review and modify the invoice through the patient’s Transactions (F8) screen. Record supplementary information on affected items by clicking on the chevron (>) at the end of line, selecting the appropriate options, and recording service text.

IMPORTANT  Once a claim has the status of PENDABLE, you cannot delete either the Payment or Invoice line in Transactions (F8). Reversing or Requoting the Invoice line is the only way of removing the invoices as a Debit.

After you are satisfied with the information provided in the invoice, click the Medicare button on either the Consultation screen or the top of the Transactions screen to send to Medicare and update the claim status to PENDED.

The Lodgement Advice should be immediately printed for the Patient as this is a manually assessed – you may wish to record on the printout the Manual Assessment status to notify the patient. The Lodgement Advice can only be printed when the claim is PENDED, because the claim has been now fully transmitted to Medicare.

Best Practice Software recommend that the Bp VIP.net user immediately actions a PENDABLE claim and resubmits to PENDED so that you are confident the claim has been submitted to Medicare and the Lodgement advice can be printed.

How Long Do I Have to Review a PENDABLE Claim?

The PENDABLE status is only applied to an invoice after the Send Claim button is clicked on the Patient Claims screen for the first time. You have within the hour of invoice submission to review and resend the claim to Medicare (either from the Consultation screen again or from the Transactions F8 screen).

After one hour you will have to repeat the Penable to Pended submission from the Transactions screens to modify and resubmit the claim.

IMPORTANT  Because it is essential to resubmit a PENDABLE invoice to PENDED within the hour, Best Practice Software recommend all pendable invoices are actioned immediately.

When Can I Print the Lodgement Advice for the Patient?

You can only print the Medicare Lodgement Advice form when a claim is transmitted with a PENDED status. No Lodgement Advice or Benefit of Claim statement is printed for pendable claims (the claim has not yet been fully transmitted or assessed by Medicare).

Because you receipted the entire balance of the invoice at the end of the consult, Medicare will make payment of the rebate directly to the patient like a normal claim, based on their assessment. Print and give the patient the Lodgement Advice for the claimant’s own record. Your practice may retain a copy in electronic or hard copy form.

Your practice will not receive assessment advice back from Medicare on a Pended claim as this is communicated to the patient or claimant and it is their responsibility to speak to Medicare if their claim is rejected.

For more information on the Lodgement Advice and Benefit of Claim documents, review Medicare Claim Forms.

Can I Same Day Delete PENDED and PENDABLE Claims?

No. Pendable claims have not been fully submitted to Medicare, so won’t show in the same day delete screen.

Pended indicates that the invoice has been resubmitted, so won’t show in the same day delete screen. All deletions must be done by phoning Medicare to action a deletion.

Can I Modify a PENDED Invoice?

You cannot modify a PENDED invoice and resubmit, as the invoice has now been transmitted to Medicare for assessment.

You will need to contact Medicare directly if there are any issues with a MEDICARE_PENDED status claim.

How Do I Find Pendable Claims in the Transactions Screen?

Pendable claims have EZ in the Batch column of the Transactions screen (F8). The Status field in the footer of the Transactions screen also shows the current status of a claim, if the related invoice line in the history is selected.

A pended claim will display with an E for electronic submission and display PENDED in the Status field in the footer of the Transaction screen.

Pendable claim showing 'Z' in the transaction history

Share this article:

An Extension to the Medicare Web Services Deadline

Medicare web services extension article blog image

The Medicare Web Services deadline has been extended, in advice provided by Services Australia.

A large number of our practices have already upgraded to Medicare Web Services-enabled versions of their software prior to the original cutoff date of the 19th of June, 2022. These practices are now successfully operating under the new Medicare Web Services framework.

For practices that are yet to upgrade to a Medicare Web Services-enabled version of software, Services Australia have provided a grace period, extending the Medicare Web Services deadline to the 28th of August, 2022.

Services Australia have advised that this grace period will NOT be extended further.

Services Australia will be contacting practices that have not yet upgraded to Medicare Web Services in the next few weeks, to ensure that practices are in the process of transitioning to the new framework.

The latest versions of Bp Premier and Bp VIP.net are both fully compliant with Medicare Web Services functionality.

Do not delay your upgrade to Medicare Web Services. Delaying your upgrade may result in longer support call times and being unable to claim if you have not switched over once the grace period ends.

Need Further Assistance?

For further information or advice on this matter, you can contact our Software Support team on 1300 40 1111 (Australia), or 0800 40 1111 (New Zealand), and selecting Bp General Products (Option 1/1) at the menu.

You can also contact us via our dedicated Medicare Web Services email address: medicarewebservices@bpsoftware.net.

Share this article:

Have You Upgraded to Medicare Web Services? The Clock is Ticking!

Upgrading to Medicare Web Services Blog Image

Have you upgraded to Medicare Web Services yet?

The 19th of June is only weeks away and if you’re not using Medicare Web Services-compatible software by then, Online Claiming and Eclipse billing will stop working for you. The team here at Bp Software is here to break down the process for you into more manageable, bite-sized pieces. So, bookmark this post, set aside a few minutes each day, and make a start because how do you eat an elephant? One bite at a time.

Step 1

If this article comes as a shock to you, and you weren’t aware of this mandatory change, please click here for an overview of Medicare Web Services, and the impact on your practice. 

Step 2

If you do not have one already, click here to register an individual account in PRODA. Services Australia steps and our Knowledge Base can help you navigate the registration process.

Step 3

If you do not have one already, register your organisation by logging into your PRODA account, selecting organisations then registering new organisation. Again, Services Australia steps and our Knowledge Base break it down nicely.

Ask the question first… Is your organisation already registered? Who set up the organisation? Who in the practice will be adding and managing your B2B device? If you haven’t had that conversation yet, now is the time. Perhaps your principal doctor originally set it up, but you, as the practice manager, will be the one managing your B2B device. You won’t be able to do that if you’re not delegated the right authority in PRODA.

Step 4

Link to Medicare Online. You’re going to need to grab some information from your system first before you jump back into PRODA, so if you’re a Bp Premier user click here, or a Bp VIP.net user, click here.

Step 5

Add or manage other members of your organisation in PRODA. If you’re the person who’ll perform functions on behalf of your organisation, you need to ensure you’re added by your PRODA RA number. Click here for more information.

Step 6

This one is exclusive to multi-location practices. Make sure you register your practice locations as subsidiary organisations in PRODA by following these steps.

Step 7

Register your B2B device. For Bp Premier users, you’ll need Saffron SP2 or later. Click here for the steps. For Bp VIP.net users, you’ll need Topaz SP1, which is on its way.  

upgraded to medicare web services quote

What's Next?

After your PRODA set up is done, you’ll need to upgrade your software. If you’re a Bp Premier user, you can do this now by upgrading to the most recently released version of Bp Premier. It’s really simple to upgrade, you just need to ensure you’re running at least Indigo SP1 and have the February 2022 data update installed. To see just how straight forward it is, check out this short demonstration:

How To Upgrade Your Version of Bp Premier on Vimeo.

If you’re a Bp VIP.net user, your Medicare Web Services compatible version is currently being worked on and will be available to you soon. In the interim, in order to be adequately prepared to upgrade when it’s ready, we strongly recommend you complete the PRODA preparation steps.

If you get stuck at any point with PRODA, Services Australia can give you a hand and for anything system related, our support teams are standing by to assist. If you don’t prepare and upgrade by June 19th, Online Claiming and Eclipse billing will stop working for you, and you’ll need to manually process your claims.

Please don’t delay and remember, how do you eat an Elephant? One bite at a time.

Authored by:

Suzi Eley Author Avatar

Suzi Eley
Training & Deployment Leader at Best Practice Software

Share this article:

Changes to Image Based Prescribing

Imaged Based Prescribing blog image.

From 1st April, 2022, prescribers may continue to fax or email digital images of paper prescriptions to the pharmacy of the patient’s choice. However, the prescriber must now send the original paper prescription to the pharmacy. The original temporary exemption that was in place from March 2020 did not require a paper copy of the prescription to be sent to the pharmacy (unless an S8 or S4 medication), we can now confirm that this is ending on March 31, 2022.

For practices using our Bp Premier product, ePrescribing is available and will ensure that an electronic version of the prescription can be provided to the patient, without the need to supply a paper copy of the prescription to the patient or pharmacy. Further information regarding ePrescribing for Bp Premier can be accessed here.

For practices using our Bp VIP.net product, we are expecting that ePrescribing will become available before the end of 2022. Until then, prescriptions that are faxed or emailed to a pharmacy will require a paper copy or the original prescription to be sent.

Authored by:

Jessica White Author Blog Picture

Jessica White
Head of Commercial and Government at Best Practice Software

Share this article:

Displaying Patient Vaccination Status in Bp VIP.net

Patient vaccination status blog image

With cases of the Omicron variant of COVID-19 surging in Australia, and recently reaching the shores of New Zealand, the desire to quickly and easily view a patient’s vaccination status when booking an appointment, or providing specialist care for a patient has never been more front of mind.  Vaccination rates across both sides of the Tasman Sea have been steadily on the rise, with over 93%, of the adult population double-vaccinated in both countries. 

Bp VIP.net is highly customisable to your practice’s individual needs, and the ability to easily record an individual patient’s vaccination status is just one of the many possibilities in your software.   One of the best places to record this information is within your UDFs, where you can create additional fields to capture quickly and easily all of the desired, and up-to-date information that you require for your patients.  COVID vaccination status is one possibility, or you may even wish to add some other additional fields such as Gender Identity, or Preferred Pronouns.  Fields like these can be added with selection lists using the Pick List function in the Form Designer, but the possibilities for customising your UDFs are endless.

One other possibility is the option to record your patients’ COVID vaccination status directly within the Patient Details UDF screen, usually accessed by hitting the F3 key (pictured below).

By capturing the COVID vaccination status of your patients within the Patient Details screen, this enables you to use this information in other areas of Bp VIP.net, such as an Autotext creation in the Appointment Book showing the vaccination status and date of vaccination.

Patient vaccination status screen in Bp VIP.net

There are some points to be aware of when customising your UDFs in Bp VIP.net. When adding a new field to your Patient Details UDF, be sure to select the Field Type of ‘Patient’. This ensures that the value entered into the field will stay in until it is manually changed. Do not add fields to your Patient Details UDF that have the field type of ‘Medical’ as these fields are designed to only capture information on one visit date, and often cause saving issues if the field is replicated on the Medical Desktop and updated by multiple users from various areas of the software.

For detailed, step-by-step instructions on how to add fields for COVID vaccination status to your Patient Details UDF, or any other additional information, be sure to access our newly published article on our Knowledge Base.

With Bp VIP.net UDFs, the possibilities for you and your practice team to customize how your software works for you are endless.  Today, we’ve been looking through the lens of COVID vaccination statues, but the same steps can be applied to recording any other information of your choosing.  If you’re interested in finding out more, be sure to access our Knowledge Base for detailed instructions, simply open the Help menu from within Bp VIP.net and click Online to be taken directly there. Our team of Training Specialists are also here to support you with timesaving tips and tricks just like this one.

You can find out more, or get in touch with us at our website.

Authored by:

Jo Monson Blog Author Image

Johanna Monson
Training & Deployment Specialist at Best Practice Software

Share this article:

Bp VIP.net Knowledge Base Improvements

VIP.net KB Improvements Blog Image

There’s good news for users of the Bp VIP.Net knowledge base! A couple of months ago, the Training and Deployment team acknowledged the gaps in the online help knowledge base, and worked out a plan to fill those gaps, particularly the various claiming channels for Australian practices as they begin their preparations for migrating practices to Medicare Web Services in 2022.

We’re very happy to announce that two dozen new articles have been published to the Bp VIP.Net Knowledge Base in the last couple of weeks, with another dozen ready to publish by end November. We appreciate your patience while we improve the learning resources we offer.

To access the Knowledge Base, select Help > Online from the menu inside Bp VIP.Net and select a button or just type into the search bar to start. User feedback is welcome at any time! Just scroll down to the bottom of any article and provide your feedback in the text box provided. The documentation team regularly reviews user feedback and will action any request for new or updated information.

System Configuration and Printing

VIPServices is the scheduling service that manages investigation results and appointment book reminders for Bp VIP.Net. A comprehensive new article aimed at administrators explains how to set up, stop, and restart this service for new installations or to troubleshoot an existing practice after an upgrade. Also included is a new article on setting workstation printing preferences for letters and templates, so that users don’t have to select a printer or paper source every time they print a script or appointment list, saving valuable time. Printing preferences also include automatic settings for RSD messages in New Zealand, and automatically populating recipients for letters that are sent out with multiple copies.

Just open the knowledge base and search for ‘vipservice’ or ‘printing preferences’!

Prescribing Setup

Prescribing workflow setup and defaults have received a boost in the knowledge base, with new articles on:

  • Combining multiple medications into a single medication protocol that can be prescribed together, saving time
  • Adding a medication route not supplied with the system
  • Inserting a record for medications prescribed elsewhere
  • Saving the dosage and frequency defaults for a patient’s medication, so they do not have to be reselected when represcribed
  • Prescribing workflow preferences for prescribers.

Not to mention information on Real Time Prescription Monitoring, introduced way back in Ruby and recently updated for all Australian states in Topaz Revision 2. Get up to speed with the status of RTPM in your state!

Open the Knowledge Base and select Setup > Prescribing.

Medicare, DVA and Health Fund Claiming

End-to-end instructions for all major claiming channels for Australian practices are now live, with new Health Fund billing for No Gap, Gap, and Gap Cover claims, complete with short and sharp video tutorials. Existing guidance on Bulk Bill and Patient claims, including in-hospital procedures, has been revised and updated to the latest version of Bp VIP.Net.

Select Management > Medicare and DVA Claiming or Health Fund Claiming to access the new articles.

While you’re there, don’t forget to search for ‘mws’ to see all of our preparation materials for your migration to Medicare Web Services, which becomes compulsory for all electronic claims in March 2022. If you haven’t already, now’s the time to start registering PRODA accounts for key personnel to get ready!

Authored by:

Jay Rose Author Image

Jay Rose
Lead Technical & Content Writer at Best Practice Software

Share this article:

Video: Prescribing in Bp VIP.net

Bp_Blog_Bp VIP.net Video

This BeInTheKnow session aims to provide clinicians with a comprehensive overview of all facets of prescribing within Bp VIP.net.

The webinar will cover the following topics:
(Drag the progress bar in the video below to jump to a specific section)

– Registering and Installing MIMS Integrated and NZULM [1:32]
– Setting script paper printer/tray defaults [02:55]
– Setting individual prescribing defaults for each doctor [04:15]
– Prescribing in Bp VIP.net [06:41]
– AIP, My Health Record & SafeScript [18:03]
– Saving and maintaining dosages [21:19]
– Repeating Prescriptions [25:00]
– Creating pre-set Medication protocols for different conditions or procedures [25:42]

Watch the video and join our expert trainer Warren Goertz to learn about Prescribing within Bp VIP.net!

Share this article: