
Leverage Bp Premier’s Bulk Verifications to reduce administrative burden and cut down on Medicare rejections due to incorrect Medicare Card details.
Best Practice integrates directly with Medicare for several functions, one of which is verifying your patients’ card details. You can individually verify your patients, but why perform individual checks when you can verify Medicare details in bulk? This feature is easy to use, will check all your patients for the day and could save you a lot of time.
So, how do I use it? From the appointment book screen, select Utilities > Bulk patient verification, and you will see this screen.
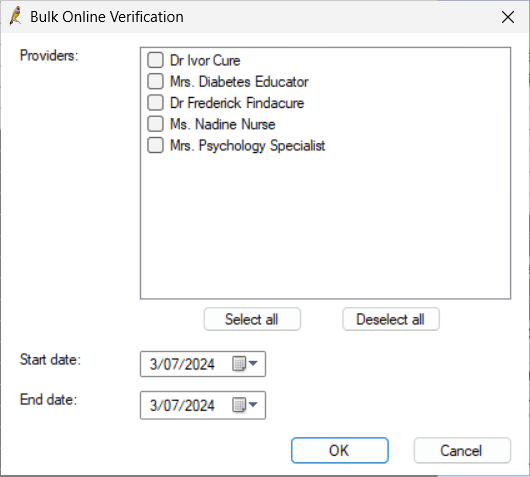
On this screen, you will select the parameters for the patient appointments you are searching for.
For example, you might like to run this utility at the start of the day for all of today’s appointments. In that case, you would click Select All to tick all your providers and make sure today’s date is selected in the calendar picker. Once you have chosen your parameters, click OK.
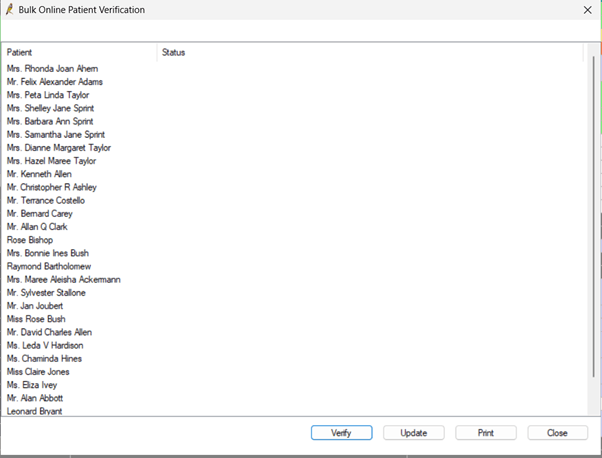
The next screen you see will give you a list of patients with appointments, and you can click Verify. Bp Premier will then connect to Medicare Web Services, check the Medicare card details for each patient in the list, and return a response.
If the patient’s card details are correct, no action is required. If their card details are incorrect, you can right-click on a patient in the list and click view details to open their patient demographics and record an appointment note. Appointment notes will pop up when arriving the patient, so we can get their Medicare card from them and update their details when they arrive at the practice instead of having to chase them. Sometimes, you will see a response from Medicare that looks like this.
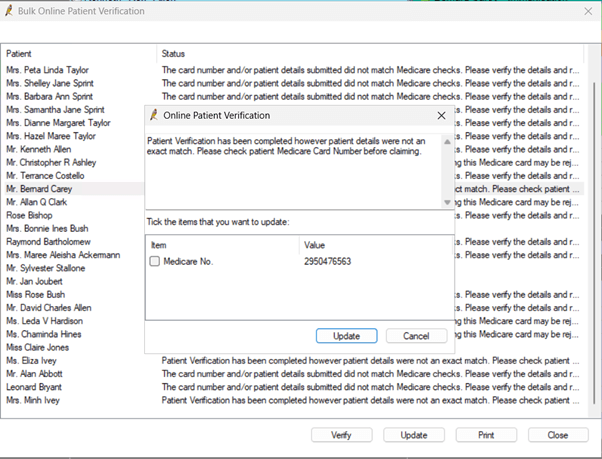
If you do see this, it means that the patient’s details were not an exact match, but Medicare was able to match the details we have with the correct patient and has returned this updated card number to us. This might happen in cases where a Medicare card has expired, and just the last digit has changed. This is a super convenient feature; we can tick the box next to Medicare No and click update, which will open the patient demographics and automatically update the Medicare card for us! We can then click save in the patient demographics window, which will save the details and let us know if other patients in our database are on the old Medicare card we just updated.
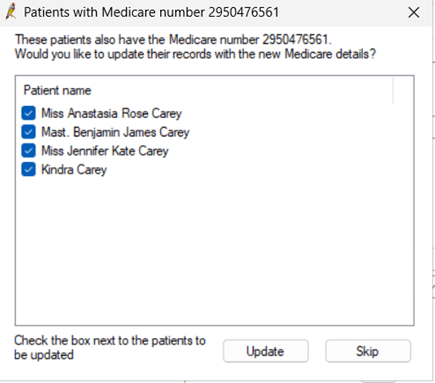
We will see this screen if other patients are on the same outdated Medicare card. From this screen, we can review the patients and click update to update an entire family on the new Medicare card in one click. This excellent time-saving feature ensures your patients have the correct details recorded.
Ultimately if you are bulk billing, you will get rejections from Medicare at some point. However, utilising the bulk patient verification utility will ensure that you have accurate data recorded and greatly reduce the number of rejections you receive from Medicare. This will save you time and ensure you receive rebates from Medicare as soon as possible.
Authored by:

Xanthe Kapczynski
Training and Deployment Specialist at Best Practice Software
Explore our range of news and training resources:
Bp Learning Video Library | Bp Learning Training Options | Bp Newsroom Blog
Subscribe to Our Newsletters | Bp Learning Webinars